Gather all necessary Drivers and Software
Next, you will need to gather the software needed to backup your files, format your hard disk and install Windows. Once your hard drive is formatted, you will not be able to access the internet (unless you have access to another computer, of course) because you computer will not have an OS installed.
Here's a List of software that you will need or find useful.
Windows XP CD:
This is available with the CDs that came with your computer if you purchased it new. They are also available in stores or you can always find them by doing a search...
Drivers:
You will need to find the drivers to all your hardware. These are available on the CD that came with your computer or motherboard when you bought it. They are also available on the manufacturer's support website. At the VERY MINIMUM, get the drivers for your network adapter. Then you can get online and download the rest of your drivers after Windows is installed.
Examples of support websites for popular brands:
http://support.asus.com/
http://support.intel.com/
http://www.gigabyte.us/Support/Default.aspx
http://www.evga.com/support/
http://www.msi.com/index.php?func=downloadindex
http://www.hp.com/#Support
http://esupport.sony.com/US/perl/index.pl
http://support.dell.com/
http://support.gateway.com/support/default.aspx
http://toshiba.com/tai/support/support_cons.jsp
http://us.acer.com/acer/service.do
http://emachines.com/support/product_support.html
ImgBurn:
This is a nifty little program that is used to burn CDs. It is verry simple, easy to use, and is compatible with almost any CD/DVD/HD-DVD/BlueRay burner.
http://www.imgburn.com/index.php?act=download
Hiren's Boot CD:
There are tons of diagnostic programs on this CD. It is very handy to have for recovery situations.
http://www.hiren.info/pages/bootcd
Mandriva Linux Live CD:
If you choose to use the Linux live CD to backup your files, then you can access the internet by booting with it, even though your hard drive has nothing on it or Windows is not working properly due to a virus.
http://www.mandriva.com/en/download/free
Burn those ISOs
Now it's time to burn the software you downloaded above. This tutorial covers how to do this with ImgBurn. If you already have the software you need on CDs or DVDs, or want to burn it with your favorite burning software, you may skip this step.
After Installing ImgBurn, open it up and you should get a dialog similar to this one:
Click on the "Write Image File to Disc" button to continue. That should bring you to a dialog like this:

Then, select the "Browse for a file" button and select your image file. Image files supported by ImgBurn include .iso, .nrg, .ape, .bin, .cdi, .cdr, .cue, .dvi, .dvd, .gcm, .gi, .ibq, .img, .lst, .mds, .pdi, & .udi. ISO is by far the most popular format. I'm using Hiren's boot CD as an example.

Make sure the CD/DVD writer device you want to write with is selected in the "destination" section. Keep the verify option checked as this will ensure that the DVD/CD is burned correctly.

Insert a DVD/CD with sufficient size to hold the image. Hiren's Boot CD is only 165MB, so it will fit on a CD with plenty of room to spare. (1) Information about the disc you entered is on the right. Make sure that the status is "empty" (2). Select the speed you want to burn at and how many copies to burn (3). Then click on the "burn" button (4).
The time it takes to burn a CD or DVD depends on the speed of your computer, the speed of your drive, the amount of data being burned, the type of discs being used and other factors.

When it has successfully completed burning, then this dialog will appear:

Now you can label the disk with a felt-tip marker so you know what it is. Repeat this process for any other discs that you need to burn.
Backup!
Before you start installing or messing around with your hard drive's partitions, you will need to back up all your important documents and settings that are stored on the partition that Windows is currently installed. If you are installing Windows to a brand new computer or a blank hard drive, you don't need to worry about this. If you are reinstalling due to a virus or other malicious program, it may be difficult or impossible to backup due to the virus. In this case, you can use a boot CD such as Hiren's Boot CD or a live or rescue CD from a linux distribution such as Mandriva to back up your files. If you have access to another computer that is working, you can put the hard drive into that computer and copy the important files off of it. Extreme caution has to be taken when doing this as it is possible that the virus infection will spread to the working computer when using this method.
Format and Partition
If you need to do advanced formatting or shrinking of partitions, use one of the man utilities included on Hiren's Boot CD.
Installing Windows
Part 1 - Text Phase
Finally, it's time to actually start the installation process.
You want to ensure that you have everything you need before you start, because you won't be able to get back online unless you have one of these things: A linux live CD that works with your computer; a spare computer; a HDD with another OS that works with your computer.
After you are sure you are ready, put your XP CD into your CD drive (if you have more than one, just pick one as the computer should boot to either one).
Then reboot your computer. Pay close attention to the screen. You should see a message saying "Press any key to boot from CD.." appear. At that point, press a key (I prefer the space bar). If you don't see that message, then you will need to refer to your computer's documentation on how to make your computer boot from the CD-ROM drive. The screen looks a lot like this:

If you pressed the key soon enough, you should see the windows setup program begin to load.


When it is done loading, the screen should look like this. Press enter to continue.

Then it will show Microsoft's EULA. Press F8 to continue.

It will show a list of the drives and available on your computer. Now select the partition that you want to install windows on and press the enter key. This example has a drive that is completely blank. To install onto a drive like this, you need to create a new partition by pressing the "C" key. This screen can also be used to delete current partitions. Just highlight the partition you want to delete, then press the "D" key. It will ask you to confirm by pressing another key. When all partitions are deleted, you will end up with a screen that looks like the one below and you can press the "C" key as well.

I recommend creating a single partition the same size as the drive. This will be the default size entered here, so just press enter.
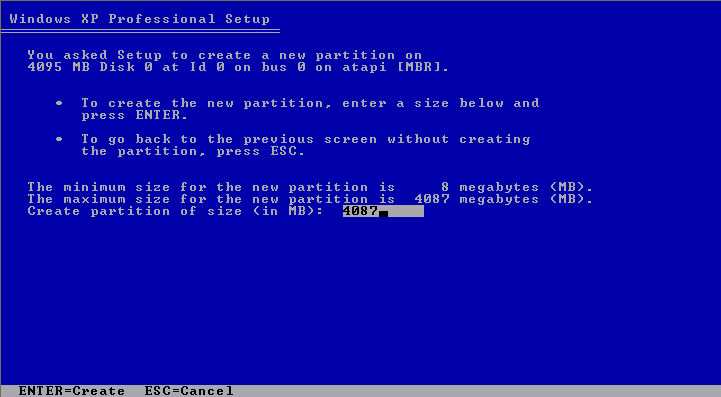
Then you have a new raw partition created. Notice that there is 8MB unpartitionable space. This always happens when using this utility to partition disk drives. It doesn't matter much in the long run and you can just ignore the extra 8MB. Now, highlight the raw partition and press enter.

Now it is time to format the partition. If the filesystem has already been formatted, you will not see this dialog. If it has been formatted as FAT32, it will ask you if you want to keep the filesystem intact or format as NTFS. The FAT options are not available for drives larger than 32GB. Normally you can just select the "NTFS (quick)" option and it works fine. If you are unsure, just select the normal NTFS format option like the example below:

Formatting will take MUCH longer if you don't select the quick option. Luckily there is a progress bar that shows the format progress.

After formatting the partition, setup will start copying a bunch of files to it. Essentially it is setting up what it needs to boot a bare bones version of windows so it can finish configuring hardware and other items in a less restricted environment.

When it is done copying files, the computer will reboot. To reboot sooner, press the enter key.

When the computer reboots, ignore the "Press a key to boot from CD..." message. It will look like Windows is starting up. Setup is only half done at this point, however.

Installing Windows
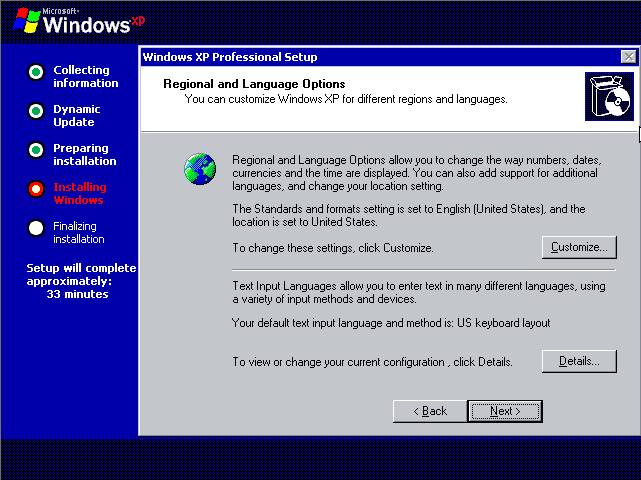
Part 2 - Graphical Phase
Windows boots into what is called the Windows Preinstall Environment. There it has more control over the system and can more easily install drivers for devices and set up other settings. There is also support for windows objects and a mouse in this phase.
Most of this phase is non-interactive. There are a bunch of screens that will display on the right. I guess that is to hold your attention while windows is installing itself. The estimated time is fairly accurate, but it depends largely on your hardware and how long it waits for your response for the interactive parts.

At this screen, you can change your regional and language options. If you want another language than US English, then select it. This and all other settings set in the graphical portion of Windows Setup can be changed later after Windows is installed.
Put whatever you want for your name and Organization. These values will show up in the "registered to" section of the system control panel. After windows is installed, they can be changed by editing the registry.

If you have a normal edition (OEM or retail) of Windows XP, then it will ask for the CD key. If you have the corporate edition, it will not ask for one. You can get this from the sticker on the side of your computer if you purchased it pre-installed (OEM). It can be found in the packaging if you purchased it in a store (retail). A retail key will not work with an OEM CD and vice versa.

Now, select a name for you computer. Sometimes setup will select one for you, but it can be kind of cryptic. Choose an administrator password as well. You don't have to choose an admin password, but if you don't then anybody with physical access to you computer can do anything that they want with it.

Now, select the date and time settings.

If you want to manually configure your network settings, select the "custom" radio button, otherwise leave it at "typical" and click the "next' button.

If your computer is going to be part of a domain, you can choose that domain here. Most home users can just leave these settings how they are and select "next".

Now the setup program will finish installing Windows. A few more screens will cycle through to keep you "entertained" while it is working.

After setup completes, Windows will load and you will see the Welcome screen. Select "Admin" or "Administrator" and type in your password to get a look at the desktop.

The next thing to do is to install all your device drivers. The network drivers are most important, followed by the display drivers. If moving around windows is choppy, that means you need to install your display drivers.
After the drivers are installed, you can restore your important data that you backed up previously. Then you can proceed to install your programs and configure the system the way you like it. I recommend only reinstalling the programs that you had when you have a need for them, as the less programs you have installed, the faster Windows will boot. A virus scanning program and a secure browser such as Firefox or Opera are the first programs you should install.
That's it for this tutorial. If you have any questions about your specific situation or configuration, ask here or send me an email and I'll see what I can do to help you out.

0 comments:
Post a Comment